
Docker部署Matrix&Element
本文最后更新于 2024-11-07,文章内容距离上一次更新已经过去了很久啦,可能已经过时了,请谨慎参考喵。
前情提要
20240924更新:推荐使用客户端:FluffyChat,地址:https://fluffychat.im/ (安卓不要下载Element!!!)
之前部署了 Tailchat,但是我没找到官方对于加密方式和安全性这方面的说明,所以又发现了一个 Matrix,这个也是开源的,并且支持 E2E 加密,会更安全
部署
首先拉取镜像:
建议先拉取镜像,等会还得生成配置文件,会方便一点。
docker pull docker.io/matrixdotorg/synapse:latest
docker pull docker.io/postgres:12-alpine
docker pull docker.io/vectorim/element-web:latest
docker-compose.yaml :
# This compose file is compatible with Compose itself, it might need some
# adjustments to run properly with stack.

# version: '3'

services:

  synapse:
    # build:
    #   context: ../..
    #   dockerfile: docker/Dockerfile
    image: docker.io/matrixdotorg/synapse:latest
    # Since synapse does not retry to connect to the database, restart upon
    # failure
    restart: unless-stopped
    # See the readme for a full documentation of the environment settings
    # NOTE: You must edit homeserver.yaml to use postgres, it defaults to sqlite
    environment:
      - SYNAPSE_CONFIG_PATH=/data/homeserver.yaml
    volumes:
      # You may either store all the files in a local folder
      - ./files:/data
      # - ./homeserver.yaml:/data/homeserver.yaml
      # .. or you may split this between different storage points
      # - ./files:/data
      # - /path/to/ssd:/data/uploads
      # - /path/to/large_hdd:/data/media
    depends_on:
      - db
      - element
    # In order to expose Synapse, remove one of the following, you might for
    # instance expose the TLS port directly:
    ports:
    #  - 8448:8448
    # ... or use a reverse proxy, here is an example for traefik:
      - 8080:8008
    labels:
      # The following lines are valid for Traefik version 1.x:
    #   - traefik.enable=true
    #   - traefik.frontend.rule=Host:my.matrix.Host
    #   - traefik.port=8008
      # Alternatively, for Traefik version 2.0:
      - traefik.enable=true
      - traefik.http.routers.http-synapse.entryPoints=http
      - traefik.http.routers.http-synapse.rule=Host(`e2e.imbhj.com`)
      - traefik.http.middlewares.https_redirect.redirectscheme.scheme=https
      - traefik.http.middlewares.https_redirect.redirectscheme.permanent=true
      - traefik.http.routers.http-synapse.middlewares=https_redirect
      - traefik.http.routers.https-synapse.entryPoints=https
      - traefik.http.routers.https-synapse.rule=Host(`e2e.imbhj.com`)
      - traefik.http.routers.https-synapse.service=synapse
      - traefik.http.routers.https-synapse.tls=true
      - traefik.http.services.synapse.loadbalancer.server.port=8008
      - traefik.http.routers.https-synapse.tls.certResolver=le-ssl

  db:
    image: docker.io/postgres:12-alpine
    # Change that password, of course!
    ports:
      - 5432:5432
    environment:
      - POSTGRES_USER=synapse
      - POSTGRES_PASSWORD=xxxxxxxxx
      # ensure the database gets created correctly
      # https://element-hq.github.io/synapse/latest/postgres.html#set-up-database
      - POSTGRES_INITDB_ARGS=--encoding=UTF-8 --lc-collate=C --lc-ctype=C
    volumes:
      # You may store the database tables in a local folder..
      - ./schemas:/var/lib/postgresql/data
      # .. or store them on some high performance storage for better results
      # - /path/to/ssd/storage:/var/lib/postgresql/data

  element:
    image: docker.io/vectorim/element-web:latest
    ports:
      - 8888:80
    volumes:
      - ./element-web/config.json:/app/config.json
注意更改数据库密码以及对应的配置项里的 服务域名或 IP 地址。
然后在当前目录下执行:
docker-compose run --rm -e SYNAPSE_SERVER_NAME=my.matrix.host -e SYNAPSE_REPORT_STATS=no synapse generate
my.matrix.host要更改为自己要部署的域名或 IP 地址,不带 http 前缀。
生成完毕之后,进入 ./files 目录下,找到 homeserver.yaml 文件,修改:
# Configuration file for Synapse.
#
# This is a YAML file: see [1] for a quick introduction. Note in particular
# that *indentation is important*: all the elements of a list or dictionary
# should have the same indentation.
#
# [1] https://docs.ansible.com/ansible/latest/reference_appendices/YAMLSyntax.html
#
# For more information on how to configure Synapse, including a complete accounting of
# each option, go to docs/usage/configuration/config_documentation.md or
# https://element-hq.github.io/synapse/latest/usage/configuration/config_documentation.html
server_name: "e2e.imbhj.com"
pid_file: /data/homeserver.pid
listeners:
  - port: 8080
    tls: false
    type: http
    x_forwarded: true
    resources:
      - names: [client, federation]
        compress: false
database:
  name: psycopg2
  args:
    # database: /data/homeserver.db
    user: synapse
    password: xxxxxxxxx
    dbname: synapse
    host: x.x.x.x
    cp_min: 5
    cp_max: 10
    # seconds of inactivity after which TCP should send a keepalive message to the server
    keepalives_idle: 10
    # the number of seconds after which a TCP keepalive message that is not
    # acknowledged by the server should be retransmitted
    keepalives_interval: 10
    # the number of TCP keepalives that can be lost before the client's connection
    # to the server is considered dead
    keepalives_count: 3
log_config: "/data/自动生成.log.config"
media_store_path: /data/media_store
registration_shared_secret: "自动生成"
enable_registration: true       # 是否允许注册
registration_requires_token: true  # 注册是否需要token
report_stats: false
macaroon_secret_key: "自动生成"
form_secret: "自动生成"
signing_key_path: "/data/自动生成.signing.key"
trusted_key_servers:
  - server_name: "matrix.org"


# vim:ft=yaml
自动生成 的部分不用管,记得修改数据库用户/密码和
docker-compose.yml文件一致,设置好数据库 IP,如果是本地就填本地 IP 即可。
回到项目根目录,创建 ./element-web/config.json 文件,写入:
{
    "default_server_name": "imbhj.com",
    "default_server_config": {
        "m.homeserver": {
            "base_url": "https://e2e.imbhj.com"
        },
        "m.identity_server": {
            "base_url": "https://vector.im"
        }
    }
}注意修改自己的域名即可,服务域名和 element 的客户端域名是不同的。
然后执行 docker-compose up -d 启动容器
创建管理员账户
容器启动起来之后,执行命令:
docker exec -it synapse register_new_matrix_user http://localhost:8008 -c /data/homeserver.yaml --help如果使用 1panel 面板进入容器终端,则可忽略命令前缀
docker exec -it synapse注意修改地址为自己的服务地址。
这是命令帮助,提示你如何操作,接下来这一行才是生成管理员账户的操作:
docker exec -it synapse register_new_matrix_user http://localhost:8008 -c /data/homeserver.yaml -a执行之后会在终端提示你输入管理员的用户名及密码,创建完毕。
注册普通账户
首先确保 homeserver.yaml 文件中开启了下面两个配置:
enable_registration: true       # 是否允许注册
registration_requires_token: true  # 注册是否需要token
之后我们需要生成一个 token,以便其他用户注册时作为校验。synapse 服务端提供了一个 admin api 用来生成 token,但实际使用上略微麻烦。经过查找发现已经有人将 admin api 封装成了页面管理端 synapse-admin。
这个管理端只是一个前端,其已经部署了一个到 GitHub Pages 上,我们在填入我们的管理员用户名、密码以及我们服务的地址后就可以直接使用了。
仓库地址:
直接访问地址:
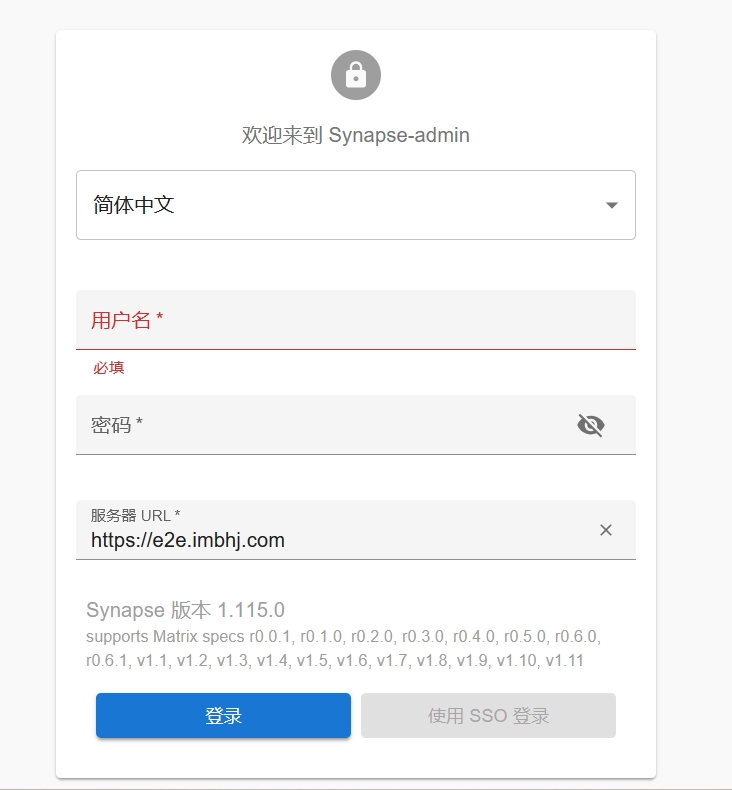
然后使用刚才在终端创建的用户名和密码登录
创建 token :
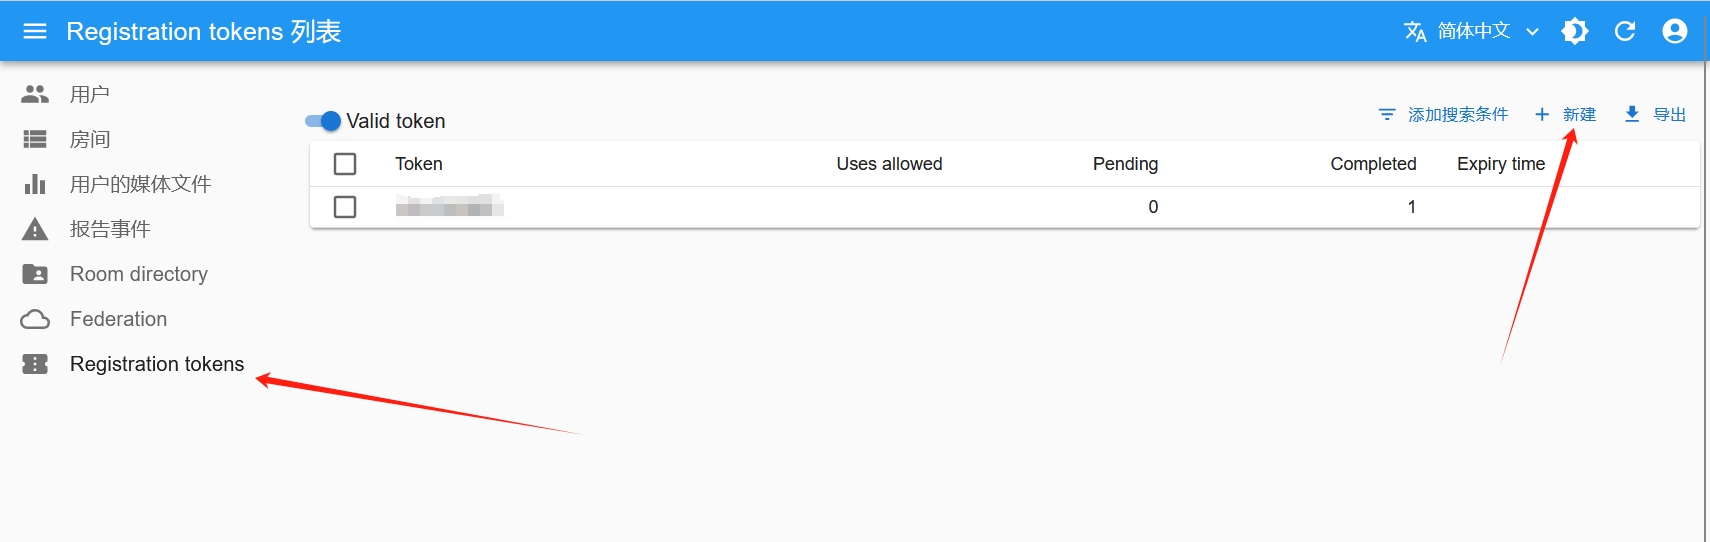
Token,这里填入我们想创建的 token 内容,允许为空。
Length,在 Token 字段为空的情况下,需要填入 Length,会自动生成一个指定长度的随机 token 值。
Uses allowed,允许 token 使用多少次,填 null(不填)则是无限次。
Expiry time,token 的过期时间,填 null(不填)则是没有过期时间。
然后就可以访问 element 客户端进行注册了,注册时填入这个 token 即可。
本文中部署的是 element-web 客户端,还有其他很多客户端,如下:
推荐使用客户端:FluffyChat,地址:https://fluffychat.im/
当用户第一次注册并登录后,客户端会提示备份密钥。这里非常建议将密钥导出并备份下来。
基于 matrix 协议的通信是端对端加密的,即除了你和对方外,整个链路上的所有人都无法看到你们交流的消息。要解密消息便需要这个密钥,如果这个密钥丢失,那么新登录的客户端将无法解密历史的所有消息数据。同样,如果这个密钥泄露,掌握服务器的人也可以通过这个密钥解密你的所有消息。
在对应的客户端的设置里都可以进行密钥的导出或者备份,务必保管好自己的密钥。
Element安卓端无法登录
如图所示:
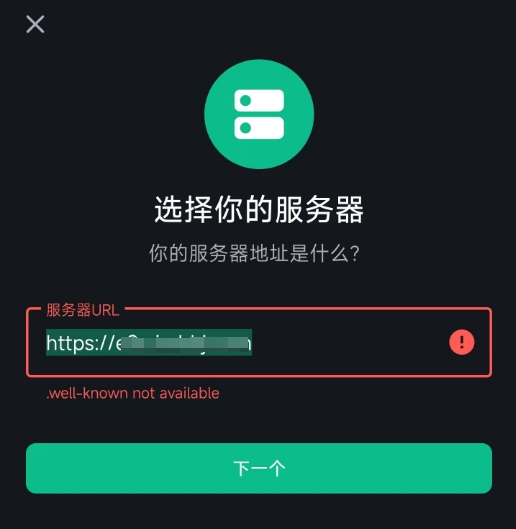
不要慌,这不是配置有问题,单纯的网络问题,多刷新几次,多登陆几次就可以了
element-web 端也是,如果打开是白屏,那么只是网络问题导致资源没加载出来,刷新一下就好了。
20240926更新
需要跨服聊天,那么必须在 homeserver.yaml 和 docker-compose.yaml 文件中使用 8448 端口以及 https 协议
本文是内网穿透部署,但是解决跨服聊天的思路是一样的,官方的配置说明中,跨服聊天要么直接访问 server_name:8448 端口走 https 协议,要么使用 .well-known/matrix/server 重新定向到 443 端口走 https 协议
建议使用第二种,需要在 homeserver.yaml 文件中开启选项 serve_server_wellknown: true ,下面会放出整个配置文件
对于移动端的跨服聊天,如果自己私服的服务器配置不行,或者 IP 纯净度不够(国内情况),
可能会导致聊天记录拉取非常慢,或者失败
可能会网络波动导致丢失部分聊天记录,无法解密
可能会网络波动导致房间或者私聊无法验证双方加密设备是否可靠
客户端、web 端如果要邀请、搜索用户,必须直接粘贴完整的 ID,否则会导致搜索不到,完整的 ID 例如:
用户:
@luobo:e2e.imbhj.com聊天室:
#test:e2e.imbhj.com
当然,只是概率性问题,我实测是可以跨服邀请、私聊、公共聊天频道的,但是目前这种部署方式无法实现语音通话和视频通话,官方文档里说需要部署中转服务器,后续再慢慢解决吧
最后放上我自己踩坑更新后的配置文件:
homeserver.yaml :
# Configuration file for Synapse.
#
# This is a YAML file: see [1] for a quick introduction. Note in particular
# that *indentation is important*: all the elements of a list or dictionary
# should have the same indentation.
#
# [1] https://docs.ansible.com/ansible/latest/reference_appendices/YAMLSyntax.html
#
# For more information on how to configure Synapse, including a complete accounting of
# each option, go to docs/usage/configuration/config_documentation.md or
# https://element-hq.github.io/synapse/latest/usage/configuration/config_documentation.html
server_name: "e2e.imbhj.com"
pid_file: /data/homeserver.pid
listeners:
  - port: 8448
    tls: false
    type: http
    x_forwarded: true
    resources:
      - names: [client, federation]
        compress: false
# database:
#   name: sqlite3
#   args:
#     database: /data/homeserver.db
database:
  name: psycopg2
  args:
    # database: /data/homeserver.db
    user: synapse
    password: xxxxxxxxx
    dbname: synapse
    host: x.x.x.x
    cp_min: 5
    cp_max: 10
    # seconds of inactivity after which TCP should send a keepalive message to the server
    keepalives_idle: 10
    # the number of seconds after which a TCP keepalive message that is not
    # acknowledged by the server should be retransmitted
    keepalives_interval: 10
    # the number of TCP keepalives that can be lost before the client's connection
    # to the server is considered dead
    keepalives_count: 3
# 是否允许注册
enable_registration: true
# 注册是否需要token
registration_requires_token: true
# 生成 /.well-known/matrix/server
serve_server_wellknown: true
# 客户端 URL
public_baseurl: https://ele.imbhj.com/
log_config: "/data/e2e.imbhj.com.log.config"
media_store_path: /data/media_store
registration_shared_secret: "Pk0V0E4q,^JnzgV+;.1;rDBt*w1fdroi1A#w,6-2HmYRXYG6PG"
report_stats: false
macaroon_secret_key: ".8TyqH#v656P7j6#lP2SO*I4iCTkbe2LSIt;tBDQy5wNsM+Ssl"
form_secret: "Qr=0K:eomNyjE;R6Rbaoa41WIrgQ~&EPqyUedBYIe=8uo3ZPMs"
signing_key_path: "/data/e2e.imbhj.com.signing.key"
trusted_key_servers:
  - server_name: "matrix.org"
  - server_name: "mozilla.org"


# vim:ft=yaml
docker-compose.yaml :
# This compose file is compatible with Compose itself, it might need some
# adjustments to run properly with stack.

# version: '3'

services:

  synapse:
    # build:
    #   context: ../..
    #   dockerfile: docker/Dockerfile
    image: docker.io/matrixdotorg/synapse:latest
    # Since synapse does not retry to connect to the database, restart upon
    # failure
    restart: unless-stopped
    # See the readme for a full documentation of the environment settings
    # NOTE: You must edit homeserver.yaml to use postgres, it defaults to sqlite
    environment:
      - SYNAPSE_CONFIG_PATH=/data/homeserver.yaml
    volumes:
      # You may either store all the files in a local folder
      - ./files:/data
      # - ./homeserver.yaml:/data/homeserver.yaml
      # .. or you may split this between different storage points
      # - ./files:/data
      # - /path/to/ssd:/data/uploads
      # - /path/to/large_hdd:/data/media
    depends_on:
      - db
      - element
    # In order to expose Synapse, remove one of the following, you might for
    # instance expose the TLS port directly:
    ports:
      - 9448:8448
      # - 8080:8008
    # ... or use a reverse proxy, here is an example for traefik:
    # labels:
      # The following lines are valid for Traefik version 1.x:
      # - traefik.enable=true
      # - traefik.frontend.rule=Host:e2e.imbhj.com
      # - traefik.port=8008
      # Alternatively, for Traefik version 2.0:
      # - traefik.enable=true
      # - traefik.http.routers.http-synapse.entryPoints=http
      # - traefik.http.routers.http-synapse.rule=Host(`e2e.imbhj.com`)
      # - traefik.http.middlewares.https_redirect.redirectscheme.scheme=https
      # - traefik.http.middlewares.https_redirect.redirectscheme.permanent=true
      # - traefik.http.routers.http-synapse.middlewares=https_redirect
      # - traefik.http.routers.https-synapse.entryPoints=https
      # - traefik.http.routers.https-synapse.rule=Host(`e2e.imbhj.com`)
      # - traefik.http.routers.https-synapse.service=synapse
      # - traefik.http.routers.https-synapse.tls=true
      # - traefik.http.services.synapse.loadbalancer.server.port=8008
      # - traefik.http.routers.https-synapse.tls.certResolver=le-ssl

  db:
    image: docker.io/postgres:12-alpine
    # Change that password, of course!
    ports:
      - 5432:5432
    environment:
      - POSTGRES_USER=synapse
      - POSTGRES_PASSWORD=xxxxxxxxx
      # ensure the database gets created correctly
      # https://element-hq.github.io/synapse/latest/postgres.html#set-up-database
      - POSTGRES_INITDB_ARGS=--encoding=UTF-8 --lc-collate=C --lc-ctype=C
    volumes:
      # You may store the database tables in a local folder..
      - ./schemas:/var/lib/postgresql/data
      # .. or store them on some high performance storage for better results
      # - /path/to/ssd/storage:/var/lib/postgresql/data

  element:
    image: docker.io/vectorim/element-web:latest
    ports:
      - 8888:80
    volumes:
      - ./element-web/config.json:/app/config.json
config.json :
{
    "default_server_name": "imbhj.com",
    "default_server_config": {
        "m.homeserver": {
            "base_url": "https://e2e.imbhj.com"
        },
        "m.identity_server": {
            "base_url": "https://vector.im"
        }
    }
}
注意修改数据库密码,服务端域名,客户端域名
参考资料
官方 GitHub 仓库:
https://github.com/element-hq/synapse
官方安装文档:
https://element-hq.github.io/synapse/latest/setup/installation.html
官方 docker-compose 文件:
https://github.com/element-hq/synapse/blob/develop/contrib/docker/docker-compose.yml
官方 docker 安装说明:
https://github.com/element-hq/synapse/tree/develop/contrib/docker
官方 docker 配置说明:
https://github.com/element-hq/synapse/blob/develop/docker/README.md
官方 postgres 数据库连接说明:
https://github.com/element-hq/synapse/blob/develop/docs/postgres.md
参考的大佬博客-任意的Blog:
https://renyili.org/post/%E8%87%AA%E5%BB%BAmatrix%E6%9C%8D%E5%8A%A1
element-web 的安装说明:
https://github.com/element-hq/element-web/blob/develop/docs/install.md
element-web 的配置说明:
https://github.com/element-hq/element-web/blob/develop/docs/config.md
element-web 的配置示例:
https://app.element.io/config.json
20241107更新
在稳定运行了一个多月后,由于SSL证书到期了,我更新了一下SSL证书,就导致服务器直接登陆不进去了,直接访问服务器会显示matrix正在运行,明显是部署成功了,但是容器状态一直显示unhealthy,客户端登录显示服务器异常,
重新部署了好几次,依然无法解决,更改端口也无法解决,查看日志并无任何报错,遂放弃部署自建matrix服务器,望周知。